前回までの記事
開発環境
| 環境 | バージョン |
|---|---|
| MacBook Air | Monterey 12.2.1 |
| Docker | 20.10.7 |
| PHP | 8.1 |
| composer | 2.2.9 |
| Laravel | 9.5.1 |
| apache | 2.4 |
| MySQL | 8.0 |
| phpmyadmin | – |
| npm | 8.5 |
| node | 12.22.11 |
| React | 17 |
| TailwindCSS | 3 |
| Laravel/breeze | ログイン認証機能で使用 ※Laravel8以降の場合に使用可。 Laravel6や7系はreact –authとか使います。 |
開発+α
◆dockerコンテナの情報を確認する
→docker ps
◆dockerのphpコンテナに入る
→docker exec -it コンテナIDまたはNAMES bash
◆var/www# はphpコンテナ内を表します。php artisanやnpm run devなどはphpコンテナ内で実行しましょう。
◆tailwindcssでスタイルを変更する前に
→npm run watchを実行していると開発が楽。
※ある程度スタイルが整ったら、npm run devでビルドしましょう。
すると、不要なcssを削除してくれるのでcssファイルが軽くなります。
- マイページ用のコントローラーを作成
- マイページのサイドバー、投稿リストのフロントを作成
最終的なゴール
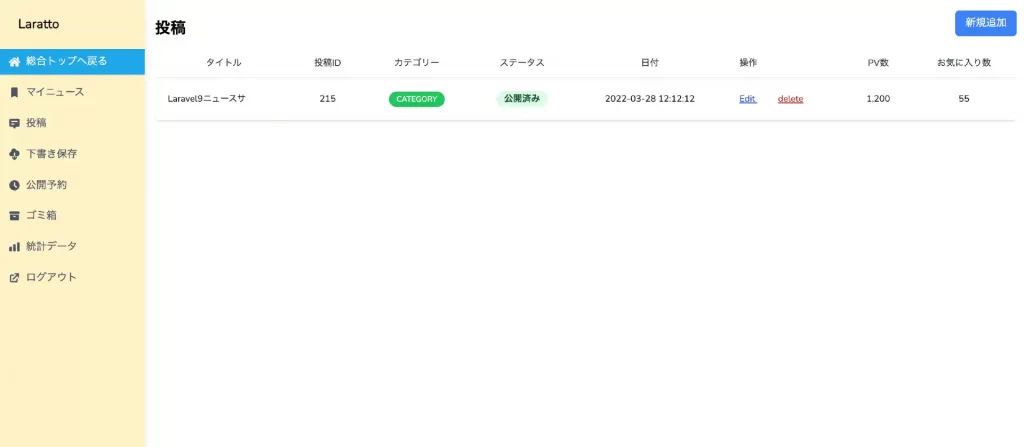
この記事では、最終的に以下のようなbladeファイルを作成します。
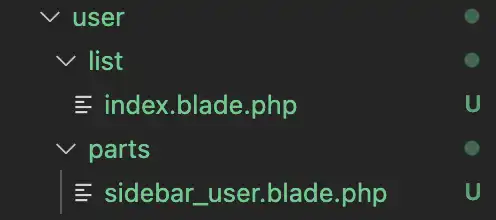
user > list配下には、サイドバーの項目であるマイニュースや投稿だったり、記事の新規追加画面などを今後作成していく方針です。
user > parts配下には、使い回すだろうマイページのサイドバーなどの共通レイアウトを配置していきます。


休日で空いた時間の暇つぶしを探せるアプリを公開しています。
bladeファイルを作成する
…/resources/views/user/list/index.blade.phpと…/resources/views/user/parts/sidebar_user.blade.phpを作成しておきましょう。
※現状、中身は何も記述してなくてOKです。

マイページ用のコントローラーを作成する
マイページ用のコントローラーを作成します。※マイページ用と言っても、機能はほとんど記事関連なのでUserディレクトリのPostControllerが中心となります。
/var/www# php artisan make:controller User/PostControllersrc/app/Http/Controllers/User/PostController.phpが作成されるので、以下のように編集しましょう。
<?php

namespace App\Http\Controllers\User;

use App\Http\Controllers\Controller;
use Illuminate\Http\Request;

class PostController extends Controller
{
    /**
     * 投稿リスト
     *
     * @param int $id ユーザーID
     * @return Response src/resources/views/user/list/index.blade.phpを表示
     */
    public function index(int $id)
    {
        return view('user.list.index');
    }
}
マイページの投稿リストのルーティングを設定する
ルーティングにパスを設定していきます。
※冒頭にuse App\Http\Controllers\User\PostController;を追加することを忘れずに。
<?php

use Illuminate\Support\Facades\Route;
use App\Http\Controllers\TopController;
use App\Http\Controllers\User\PostController; // 追加

/*
|--------------------------------------------------------------------------
| Web Routes
|--------------------------------------------------------------------------
|
| Here is where you can register web routes for your application. These
| routes are loaded by the RouteServiceProvider within a group which
| contains the "web" middleware group. Now create something great!
|
*/
Route::get('/dashboard', function () {
    return view('dashboard');
})->middleware(['auth'])->name('dashboard');

require __DIR__.'/auth.php';

// 総合トップ
Route::get('/', [TopController::class, 'top'])
    ->name('top');

// マイページ
Route::get('/user/{id}/index', [PostController::class, 'index'])
    ->name('user.index');
これで、/user/1/indexにとりあえずアクセスできます。今はuser > list > index.blade.phpに何も記述していないので画面は真っ白かと思います。
マイページ用のサイドバーと投稿のフロント部分を作成していきましょう。
ちなみに継承するレイアウトは、総合トップのlayouts > common.blade.phpが使えるので活用しますね。
src/resources/views/layouts/common.blade.phpは以下のようになっていると思いますが、マイページでは@yield(‘sidebar’)と@yield(‘content’)だけ使います。
...
</head>
<body>
    <div>
        @yield('header')
    </div>
    <div class="flex">
        <div class="w-1/6">
            @yield('sidebar')  ←マイページのサイドバー(sidebar_user.blade.php)を代入する
        </div>
        <main class="w-full">
            @yield('content')  ←マイページのリスト(list > index.blade.phpbなど)を代入する
        </main>
    </div>
    <div>
        @yield('footer')
    </div>
</body>
</html>
マイページのサイドバーを作成する
完成図※左部分

マイページに上記のようなサイドバーを作成します。
今回マイページのサイドバーは、tailwind-kitのDatas dashboard templatesを参考にしました。
src/resources/views/user/parts/sidebar_user.blade.phpを以下のように編集します。
※スタイルを変更する前にnpm run watchを実行するのがおすすめです。
@section('sidebar')
<div class="h-screen hidden lg:block shadow-lg relative w-50">
    <div class="bg-amber-100 h-full">
        <div class="flex items-center justify-start pt-6 ml-8">
            <p class="font-bold text-xl">
                Laratto
            </p>
        </div>
        <nav class="mt-6">
            <div>
                <a class="flex items-center px-4 py-2 mt-2 text-gray-600 transition-colors duration-200 transform hover:bg-sky-500 hover:text-white"
                href="{{ route('top') }}">
                    <span class="text-left">
                        <svg width="20" height="20" fill="currentColor" viewBox="0 0 1792 1792" xmlns="http://www.w3.org/2000/svg">
                            <path d="M1472 992v480q0 26-19 45t-45 19h-384v-384h-256v384h-384q-26 0-45-19t-19-45v-480q0-1 .5-3t.5-3l575-474 575 474q1 2 1 6zm223-69l-62 74q-8 9-21 11h-3q-13 0-21-7l-692-577-692 577q-12 8-24 7-13-2-21-11l-62-74q-8-10-7-23.5t11-21.5l719-599q32-26 76-26t76 26l244 204v-195q0-14 9-23t23-9h192q14 0 23 9t9 23v408l219 182q10 8 11 21.5t-7 23.5z">
                            </path>
                        </svg>
                    </span>
                    <span class="mx-2 text-md font-normal">
                        総合トップへ戻る
                    </span>
                </a>
            </div>
            <div>
                <a class="flex items-center px-4 py-2 mt-2 text-gray-600 transition-colors duration-200 transform hover:bg-sky-500 hover:text-white"
                href="#">
                    <span class="text-left">
                        <svg xmlns="http://www.w3.org/2000/svg" class="h-5 w-5" viewBox="0 0 20 20" fill="currentColor">
                            <path d="M5 4a2 2 0 012-2h6a2 2 0 012 2v14l-5-2.5L5 18V4z" />
                        </svg>
                    </span>
                    <span class="mx-2 text-md font-normal">
                        マイニュース
                    </span>
                </a>
            </div>
            <div>
                <a class="flex items-center px-4 py-2 mt-2 text-gray-600 transition-colors duration-200 transform hover:bg-sky-500 hover:text-white"
                href="#">
                    <span class="text-left">
                        <svg xmlns="http://www.w3.org/2000/svg" class="h-5 w-5" viewBox="0 0 20 20" fill="currentColor">
                            <path fill-rule="evenodd" d="M18 13V5a2 2 0 00-2-2H4a2 2 0 00-2 2v8a2 2 0 002 2h3l3 3 3-3h3a2 2 0 002-2zM5 7a1 1 0 011-1h8a1 1 0 110 2H6a1 1 0 01-1-1zm1 3a1 1 0 100 2h3a1 1 0 100-2H6z" clip-rule="evenodd" />
                        </svg>
                    </span>
                    <span class="mx-2 text-md font-normal">
                        投稿
                    </span>
                </a>
            </div>
            <div>
                <a class="flex items-center px-4 py-2 mt-2 text-gray-600 transition-colors duration-200 transform hover:bg-sky-500 hover:text-white"
                href="#">
                    <span class="text-left">
                        <svg xmlns="http://www.w3.org/2000/svg" class="h-5 w-5" viewBox="0 0 20 20" fill="currentColor">
                            <path fill-rule="evenodd" d="M2 9.5A3.5 3.5 0 005.5 13H9v2.586l-1.293-1.293a1 1 0 00-1.414 1.414l3 3a1 1 0 001.414 0l3-3a1 1 0 00-1.414-1.414L11 15.586V13h2.5a4.5 4.5 0 10-.616-8.958 4.002 4.002 0 10-7.753 1.977A3.5 3.5 0 002 9.5zm9 3.5H9V8a1 1 0 012 0v5z" clip-rule="evenodd" />
                        </svg>
                    </span>
                    <span class="mx-2 text-md font-normal">
                        下書き保存
                    </span>
                </a>
            </div>
            <div>
                <a class="flex items-center px-4 py-2 mt-2 text-gray-600 transition-colors duration-200 transform hover:bg-sky-500 hover:text-white"
                href="#">
                    <span class="text-left">
                        <svg xmlns="http://www.w3.org/2000/svg" class="h-5 w-5" viewBox="0 0 20 20" fill="currentColor">
                            <path fill-rule="evenodd" d="M10 18a8 8 0 100-16 8 8 0 000 16zm1-12a1 1 0 10-2 0v4a1 1 0 00.293.707l2.828 2.829a1 1 0 101.415-1.415L11 9.586V6z" clip-rule="evenodd" />
                        </svg>
                    </span>
                    <span class="mx-2 text-md font-normal">
                        公開予約
                    </span>
                </a>
            </div>
            <div>
                <a class="flex items-center px-4 py-2 mt-2 text-gray-600 transition-colors duration-200 transform hover:bg-sky-500 hover:text-white"
                href="#">
                    <span class="text-left">
                        <svg xmlns="http://www.w3.org/2000/svg" class="h-5 w-5" viewBox="0 0 20 20" fill="currentColor">
                            <path d="M4 3a2 2 0 100 4h12a2 2 0 100-4H4z" />
                            <path fill-rule="evenodd" d="M3 8h14v7a2 2 0 01-2 2H5a2 2 0 01-2-2V8zm5 3a1 1 0 011-1h2a1 1 0 110 2H9a1 1 0 01-1-1z" clip-rule="evenodd" />
                          </svg>
                    </span>
                    <span class="mx-2 text-md font-normal">
                        ゴミ箱
                    </span>
                </a>
            </div>
            <div>
                <a class="flex items-center px-4 py-2 mt-2 text-gray-600 transition-colors duration-200 transform hover:bg-sky-500 hover:text-white"
                href="#">
                    <span class="text-left">
                        <svg xmlns="http://www.w3.org/2000/svg" class="h-5 w-5" viewBox="0 0 20 20" fill="currentColor">
                            <path d="M2 11a1 1 0 011-1h2a1 1 0 011 1v5a1 1 0 01-1 1H3a1 1 0 01-1-1v-5zM8 7a1 1 0 011-1h2a1 1 0 011 1v9a1 1 0 01-1 1H9a1 1 0 01-1-1V7zM14 4a1 1 0 011-1h2a1 1 0 011 1v12a1 1 0 01-1 1h-2a1 1 0 01-1-1V4z" />
                        </svg>
                    </span>
                    <span class="mx-2 text-md font-normal">
                        統計データ
                    </span>
                </a>
            </div>
            <div>
                <a class="flex items-center px-4 py-2 mt-2 text-gray-600 transition-colors duration-200 transform hover:bg-sky-500 hover:text-white"
                href="#">
                    <span class="text-left">
                        <svg xmlns="http://www.w3.org/2000/svg" class="h-5 w-5" viewBox="0 0 20 20" fill="currentColor">
                            <path d="M11 3a1 1 0 100 2h2.586l-6.293 6.293a1 1 0 101.414 1.414L15 6.414V9a1 1 0 102 0V4a1 1 0 00-1-1h-5z" />
                            <path d="M5 5a2 2 0 00-2 2v8a2 2 0 002 2h8a2 2 0 002-2v-3a1 1 0 10-2 0v3H5V7h3a1 1 0 000-2H5z" />
                        </svg>
                    </span>
                    <span class="mx-2 text-md font-normal">
                        ログアウト
                    </span>
                </a>
            </div>
        </nav>
    </div>
</div>
@endsection
npm run watchでソースの変更を監視しながらスタイルを調整していき、整ったらnpm run devでビルドしてcssファイルを軽くします。
src/resources/views/user/list/index.blade.phpを以下のように編集すれば、マイページのサイドバーが表示できます。
※表示されない場合は、npm run dev実行したり、スーパーリロードをしましょう。
{{-- src/resources/views/layouts/common.blade.php継承 --}}
@extends('layouts.common')

@include('user.parts.sidebar_user')
@section('content')

@endsection
sidebar_admin.blade.phpの総合トップへ戻るにaタグでhref=”{{ route(‘top’) }}”を記載しています。
なので、総合トップへ戻るをクリックすると、前回作成した総合トップページにアクセスできることが確認できます。
(ここで一曲好きな音楽聴いて気晴らし)
投稿リストのフロント部分を作成する
完成図※右側部分

マイページのサイドバーもできたので、メイン部分である投稿リストのフロント部分を作成していきましょう。
投稿リストは、tailwind-kitのtableのStylisedを参考にしました。
src/resources/views/user/list/index.blade.phpを以下のように編集します。
{{-- src/resources/views/layouts/common.blade.php継承 --}}
@extends('layouts.common')

@include('user.parts.sidebar_user')
@section('content')
<div class="h-screen overflow-y-scroll">
    <div class="px-4 sm:px-4">
        <div class="flex justify-between">
            <div class="text-2xl font-bold pt-7">投稿</div>
            <div class="pt-4">
                <button class="bg-blue-500 text-white px-4 py-2 rounded-md text-1xl font-medium hover:bg-blue-700 transition duration-300">新規追加</button>
            </div>
        </div>
        <div class="py-4">
            <div class="overflow-x-auto">
                <div class="inline-block min-w-full shadow rounded-lg overflow-hidden">
                    <table class="min-w-full leading-normal">
                        <thead>
                            <tr>
                                <th scope="col" class="px-5 py-3 bg-white  border-b border-gray-200 text-gray-800  text-center text-sm uppercase font-normal">
                                    タイトル
                                </th>
                                <th scope="col" class="px-5 py-3 bg-white  border-b border-gray-200 text-gray-800  text-center text-sm uppercase font-normal">
                                    投稿ID
                                </th>
                                <th scope="col" class="px-5 py-3 bg-white  border-b border-gray-200 text-gray-800  text-center text-sm uppercase font-normal">
                                    カテゴリー
                                </th>
                                <th scope="col" class="px-5 py-3 bg-white  border-b border-gray-200 text-gray-800  text-center text-sm uppercase font-normal">
                                    ステータス
                                </th>
                                <th scope="col" class="px-5 py-3 bg-white  border-b border-gray-200 text-gray-800  text-center text-sm uppercase font-normal">
                                    日付
                                </th>
                                <th scope="col" class="px-5 py-3 bg-white  border-b border-gray-200 text-gray-800  text-left text-sm uppercase font-normal">
                                    操作
                                </th>
                                <th scope="col" class="px-5 py-3 bg-white  border-b border-gray-200 text-gray-800  text-center text-sm uppercase font-normal">
                                    PV数
                                </th>
                                <th scope="col" class="px-5 py-3 bg-white  border-b border-gray-200 text-gray-800  text-center text-sm uppercase font-normal">
                                    お気に入り数
                                </th>
                            </tr>
                        </thead>
                        <tbody>
                            <tr>
                                <td class="px-5 py-5 border-b border-gray-200 bg-white text-sm">
                                    <p class="text-left text-gray-900 whitespace-no-wrap">
                                        Laravel9ニュースサ
                                    </p>
                                </td>
                                <td class="px-5 py-5 border-b border-gray-200 bg-white text-sm">
                                    <p class="text-center text-gray-900 whitespace-no-wrap">
                                        215
                                    </p>
                                </td>
                                <td class="px-5 py-5 border-b border-gray-200 bg-white text-sm text-center">
                                    <span class="bg-green-500 rounded-full text-white px-3 py-1 text-xs uppercase font-medium">
                                        Category
                                    </span>
                                </td>
                                <td class="px-5 py-5 border-b border-gray-200 bg-white text-sm text-center">
                                    <span class="relative inline-block px-3 py-1 font-semibold text-green-900 leading-tight">
                                        <span aria-hidden="true" class="absolute inset-0 bg-green-200 opacity-50 rounded-full">
                                        </span>
                                        <span class="relative">
                                            公開済み
                                        </span>
                                    </span>
                                </td>
                                <td class="px-5 py-5 border-b border-gray-200 bg-white text-sm">
                                    <p class="text-center text-gray-900 whitespace-no-wrap">
                                        2022-03-28 12:12:12
                                    </p>
                                </td>
                                <td class="px-5 py-5 mr-5 border-b border-gray-200 bg-white text-sm">
                                    <a class="mr-3 text-blue-700 whitespace-no-wrap underline" href="#">
                                        Edit
                                    </a>
                                    <a class="ml-5 underline text-red-700 whitespace-no-wrap" href="#">
                                        delete
                                    </a>
                                </td>
                                <td class="px-5 py-5 border-b border-gray-200 bg-white text-sm">
                                    <p class="text-center text-gray-900 whitespace-no-wrap">
                                        1,200
                                    </p>
                                </td>
                                <td class="px-5 py-5 border-b border-gray-200 bg-white text-sm">
                                    <p class="text-center text-gray-900 whitespace-no-wrap">
                                        55
                                    </p>
                                </td>
                            </tr>
                        </tbody>
                    </table>
                </div>
            </div>
        </div>
    </div>
</div>
@endsection
これでサイドバーも投稿リストもできたので、/user/1/indexにアクセスすると、この記事の目標である以下の画面になっていることを確認してください。

ここまでで、この記事でやるべきことは達成したのでお疲れ様でした。
少しティータイムでも挟んで、次に進みましょう!
次回からはユーザーの新規登録・ログイン・ログアウト周りの機能を追加していきます。


休日で空いた時間の暇つぶしを探せるアプリを公開しています。










コメント