前回までの記事
開発環境
| 環境 | バージョン |
|---|---|
| MacBook Air | Monterey 12.2.1 |
| Docker | 20.10.7 |
| PHP | 8.1 |
| composer | 2.2.9 |
| Laravel | 9.5.1 |
| apache | 2.4 |
| MySQL | 8.0 |
| phpmyadmin | – |
| npm | 8.5 |
| node | 12.22.11 |
| React | 17 |
| TailwindCSS | 3 |
| Laravel/breeze | ログイン認証機能で使用 ※Laravel8以降の場合に使用可。 Laravel6や7系はreact –authとか使います。 |
開発+α
◆dockerコンテナの情報を確認する
→docker ps
◆dockerのphpコンテナに入る
→docker exec -it コンテナIDまたはNAMES bash
◆var/www# はphpコンテナ内を表します。php artisanやnpm run devなどはphpコンテナ内で実行しましょう。
◆tailwindcssでスタイルを変更する前に
→npm run watchを実行していると開発が楽。
※ある程度スタイルが整ったら、npm run devでビルドしましょう。
すると、不要なcssを削除してくれるのでcssファイルが軽くなります。
◆スタイルが適用されないときは….
npm run devで一旦ビルドしてみるか、スーパーリロードでキャッシュの削除をしてみましょう。
- 詳細画面
- 記事の詳細の処理
- サービスクラスでロジックを切り分ける
最終的なゴール
- マイページの記事詳細
記事のタイトルをクリック

記事詳細画面に遷移
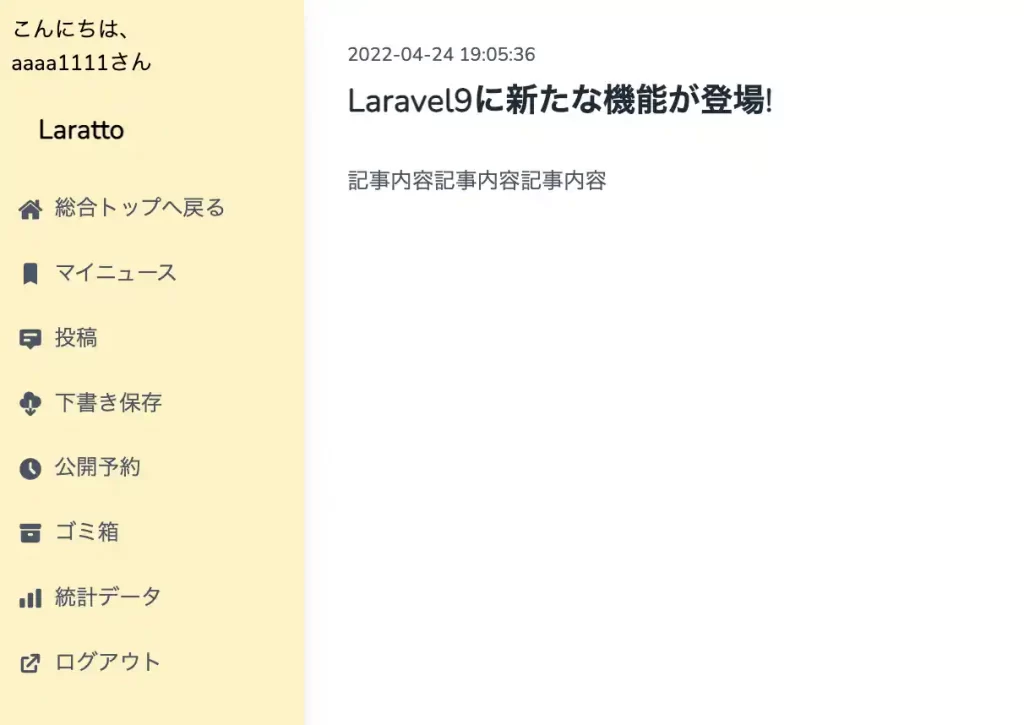
この記事の内容を実装するにあたり、総合トップ画面からログインを済まし、マイページに遷移しておいてください。
- 総合トップ画面から記事の詳細
続きを読むをクリック
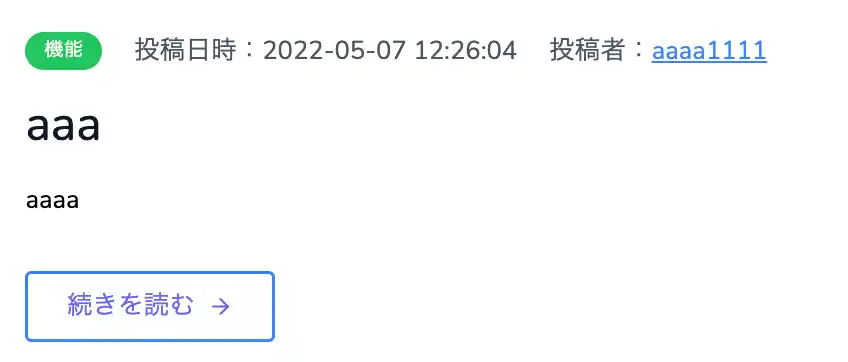


休日で空いた時間の暇つぶしを探せるアプリを公開しています。
マイページで記事の詳細を実装する
完成図

マイページの記事詳細を実装するステップは以下です。
(まあ基本的にはどのロジックも似たような感じなので、ウェーイ!ってなってればいいです。だいたいルーティング→コントローラー・モデル・ビューの作成なんで。)
マイページ記事詳細のルーティングパスを設定する
マイページの記事詳細のルーティングを追加しましょう。/post/show/{post_id}でアクセスするようにしました。
<?php

use Illuminate\Support\Facades\Route;
use App\Http\Controllers\TopController;
use App\Http\Controllers\User\PostController;

/*
|--------------------------------------------------------------------------
| Web Routes
|--------------------------------------------------------------------------
|
| Here is where you can register web routes for your application. These
| routes are loaded by the RouteServiceProvider within a group which
| contains the "web" middleware group. Now create something great!
|
*/
Route::get('/dashboard', function () {
    return view('dashboard');
})->middleware(['auth'])->name('dashboard');

require __DIR__.'/auth.php';

// 総合トップ
Route::get('/', [TopController::class, 'top'])
    ->name('top');

// マイページトップ・投稿
Route::get('/user/{id}/index', [PostController::class, 'index'])
    ->name('user.index');

// 投稿登録画面
Route::get('/post/create', [PostController::class, 'create'])
    ->name('post.create');

// 投稿登録処理
Route::post('/post/store', [PostController::class, 'store'])
    ->name('post.store');

// 投稿詳細
Route::get('/post/show/{post_id}', [PostController::class, 'show'])
    ->name('post.show');
Postコントローラーのshowメソッドに記事詳細の処理を書いていきます。
Postコントローラーに記事詳細の処理を書く
Postコントローラーにshowメソッドを書き、記事詳細の処理を組みましょう。
まだ未作成のfeachPostDateByPostId($post_id)は後ほどPostモデルに、view(‘user.list.show’)は、後ほどviews > user > list配下に作成しますのでどうかご安心を。
<?php

namespace App\Http\Controllers\User;

use App\Http\Controllers\Controller;
use Illuminate\Support\Facades\Auth;
use Illuminate\Http\Request;
use App\Models\Post;
use App\Models\Category;
use App\Http\Requests\PostRequest;

class PostController extends Controller
{
    private $post;
    private $category;

    public function __construct()
    {
        $this->post = new Post();
        $this->category = new Category();
    }

    /**
     * 投稿リスト
     *
     * @param int $id ユーザーID
     * @return Response src/resources/views/user/list/index.blade.phpを表示
     */
    public function index(int $id)
    {
        // ユーザーIDと一致する投稿データを取得
        $posts = $this->post->getAllPostsByUserId($id);
        return view('user.list.index', compact(
            'posts',
        ));
    }

    /**
     * 記事投稿画面
     *
     * @return Response src/resources/views/user/list/create.blade.phpを表示
     */
    public function create()
    {
        // カテゴリーデータを全件取得
        $categories = $this->category->getAllCategories();
        return view('user.list.create', compact(
            'categories',
        ));
    }

    /**
     * 記事投稿処理
     *
     * @param string $request リクエストデータ
     * @return Response src/resources/views/user/list/index.blade.phpを表示
     */
    public function store(PostRequest $request)
    {
        // ログインしているユーザー情報を取得
        $user = Auth::user();
        // ログインユーザー情報からユーザーIDを取得
        $user_id = $user->id;

        switch (true) {
            // 下書き保存クリック時の処理
            case $request->has('save_draft'):
                $this->post->insertPostToSaveDraft($user_id, $request);
                break;
            // 公開クリック時の処理
            case $request->has('release'):
                $this->post->insertPostToRelease($user_id, $request);
                break;
            // 予約公開クリック時の処理
            case $request->has('reservation_release'):
                $this->post->insertPostToReservationRelease($user_id, $request);
                break;
            // 上記以外の処理
            default:
                $this->post->insertPostToSaveDraft($user_id, $request);
                break;
        }

        return to_route('user.index', ['id' => $user_id]);
    }

    /**
     * 記事詳細
     *
     * @param int $post_id 投稿ID
     * @return Response src/resources/views/user/list/show.blade.phpを表示
     */
    public function show($post_id) {
        // リクエストされた投稿IDをもとにpostsテーブルから一意のデータを取得
        $showPostData = $this->post->feachPostDateByPostId($post_id);
        return view('user.list.show', compact(
            'showPostData',
        ));
    }
}
Postモデルに記事詳細ロジックを追加する
先ほどPostコントローラーで出てきた、記事詳細ロジックのfeachPostDateByPostId($post_id)をPostモデルに書いていきます。
<?php

namespace App\Models;

use Illuminate\Database\Eloquent\Factories\HasFactory;
use Illuminate\Database\Eloquent\Model;
use App\Models\Category;
use Illuminate\Support\Carbon;

/**
 * 投稿モデル
 */
class Post extends Model
{
    /**
     * モデルに関連付けるテーブル
     *
     * @var string
     */
    protected $table = 'posts';

    /**
     * 複数代入可能な属性
     *
     * @var array
     */
    protected $fillable = [
        'user_id',
        'category_id',
        'title',
        'body',
        'publish_flg',
        'view_counter',
        'favorite_counter',
        'delete_flg',
        'created_at',
        'updated_at'
    ];

    /**
     * Categoryモデルとリレーション
     */
    public function category()
    {
        return $this->belongsTo(Category::class);
    }

    /**
     * ユーザーIDに紐づいた投稿リストを全て取得する
     *
     * @param int $user_id ユーザーID
     * @return Post
     */
    public function getAllPostsByUserId($user_id)
    {
        $result = $this->where('user_id', $user_id)->with('category')->get();
        return $result;
    }

    /**
     * 下書き保存=>publish_flg=0
     * リクエストされたデータをpostsテーブルにinsertする
     *
     * @param int $user_id ログインユーザーID
     * @param array $request リクエストデータ
     * @return object $result App\Models\Post
     */
    public function insertPostToSaveDraft($user_id, $request)
    {
        $result = $this->create([
            'user_id'          => $user_id,
            'category_id'      => $request->category,
            'title'            => $request->title,
            'body'             => $request->body,
            'publish_flg'      => 0,
            'view_counter'     => 0,
            'favorite_counter' => 0,
            'delete_flg'       => 0,
        ]);
        return $result;
    }

    /**
     * 公開=>publish_flg=1
     * リクエストされたデータをpostsテーブルにinsertする
     *
     * @param int $user_id ログインユーザーID
     * @param array $request リクエストデータ
     * @return object $result App\Models\Post
     */
    public function insertPostToRelease($user_id, $request)
    {
        $result = $this->create([
            'user_id'          => $user_id,
            'category_id'      => $request->category,
            'title'            => $request->title,
            'body'             => $request->body,
            'publish_flg'      => 1,
            'view_counter'     => 0,
            'favorite_counter' => 0,
            'delete_flg'       => 0,
        ]);
        return $result;
    }

    /**
     * 予約公開=>publish_flg=2
     * リクエストされたデータをpostsテーブルにinsertする
     *
     * @param int $user_id ログインユーザーID
     * @param array $request リクエストデータ
     * @return object $result App\Models\Post
     */
    public function insertPostToReservationRelease($user_id, $request)
    {
        $result = $this->create([
            'user_id'          => $user_id,
            'category_id'      => $request->category,
            'title'            => $request->title,
            'body'             => $request->body,
            'publish_flg'      => 2,
            'view_counter'     => 0,
            'favorite_counter' => 0,
            'delete_flg'       => 0,
        ]);
        return $result;
    }

    /**
     * 投稿IDをもとにpostsテーブルから一意の投稿データを取得
     *
     * @param int $post_id 投稿ID
     * @return object $result App\Models\Post
     */
    public function feachPostDateByPostId($post_id)
    {
        $result = $this->find($post_id);
        return $result;
    }
}
ここで使うEloquentは、findメソッドです。findメソッドは、特定のIDをもとに一つのデータを取得してくれるメソッドなんですよね〜。
詳しくは、Laravel9公式ドキュメントのEloquentを参照。(ドキュメント内でfindで検索すると出てくる出てくる)
マイページの記事詳細画面を作成する
Postコントローラーでview(‘user.list.show’)の画面を返すようにしていたので、約束通りresources/views/user/list以下にshow.blade.phpを新規で作成し、その中に詳細画面を書いていきます。
{{-- src/resources/views/layouts/common.blade.php継承 --}}
@extends('layouts.common')

@include('user.parts.sidebar_user')
@section('content')
<div class="px-8 py-8 mx-auto bg-white">
    <div class="flex items-center justify-between">
        <span class="text-sm font-light text-gray-600">{{ $showPostData->updated_at }}</span>
    </div>

    <div class="mt-2">
        <p class="text-2xl font-bold text-gray-800">{{ $showPostData->title }}</p>
        <p class="mt-8 text-gray-600">{{ $showPostData->body }}</p>
    </div>
</div>
@endsection
ほ〜らこんな感じの画面ができたのではないですかね〜。

マイページの投稿一覧からリンクをつけて、記事詳細に遷移できるようにする
投稿一覧から、リンクをつけてそれぞれ個別の記事の詳細へレッツゴーできるようにします。
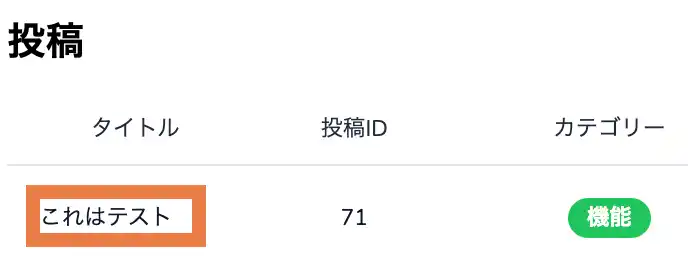
記事のタイトルをクリックして記事詳細画面に行けるようにすることです。
{{-- src/resources/views/layouts/common.blade.php継承 --}}
@extends('layouts.common')

@include('user.parts.sidebar_user')
@section('content')
<div class="h-screen overflow-y-scroll">
    <div class="px-4 sm:px-4">
        <div class="flex justify-between">
            <div class="text-2xl font-bold pt-7">投稿</div>
            <div class="pt-4">
                <a href="{{ route('post.create') }}">
                    <button class="bg-blue-500 text-white px-4 py-2 rounded-md text-1xl font-medium hover:bg-blue-700 transition duration-300">
                        新規追加
                    </button>
                </a>
            </div>
        </div>
        <div class="py-4">
            <div class="overflow-x-auto">
                <div class="inline-block min-w-full shadow rounded-lg overflow-hidden">
                    <table class="min-w-full leading-normal">
                        <thead>
                            <tr>
                                <th scope="col" class="px-5 py-3 bg-white  border-b border-gray-200 text-gray-800  text-center text-sm uppercase font-normal">
                                    タイトル
                                </th>
                                <th scope="col" class="px-5 py-3 bg-white  border-b border-gray-200 text-gray-800  text-center text-sm uppercase font-normal">
                                    投稿ID
                                </th>
                                <th scope="col" class="px-5 py-3 bg-white  border-b border-gray-200 text-gray-800  text-center text-sm uppercase font-normal">
                                    カテゴリー
                                </th>
                                <th scope="col" class="px-5 py-3 bg-white  border-b border-gray-200 text-gray-800  text-center text-sm uppercase font-normal">
                                    ステータス
                                </th>
                                <th scope="col" class="px-5 py-3 bg-white  border-b border-gray-200 text-gray-800  text-center text-sm uppercase font-normal">
                                    日付
                                </th>
                                <th scope="col" class="px-5 py-3 bg-white  border-b border-gray-200 text-gray-800  text-left text-sm uppercase font-normal">
                                    操作
                                </th>
                                <th scope="col" class="px-5 py-3 bg-white  border-b border-gray-200 text-gray-800  text-center text-sm uppercase font-normal">
                                    PV数
                                </th>
                                <th scope="col" class="px-5 py-3 bg-white  border-b border-gray-200 text-gray-800  text-center text-sm uppercase font-normal">
                                    お気に入り数
                                </th>
                            </tr>
                        </thead>
                        <tbody>
                            @foreach ($posts as $post)
                            <tr>
                                <td class="px-5 py-5 border-b border-gray-200 bg-white text-sm w-40">
                                    <a href="{{ route('post.show', ['post_id' => $post->id]) }}" class="hover:underline">
                                        <p class="text-left text-gray-900 whitespace-no-wrap">
                                            {{ $post->title }}
                                        </p>
                                    </a>
                                </td>
                                <td class="px-5 py-5 border-b border-gray-200 bg-white text-sm">
                                    <p class="text-center text-gray-900 whitespace-no-wrap">
                                        {{ $post->id }}
                                    </p>
                                </td>
                                <td class="px-5 py-5 border-b border-gray-200 bg-white text-sm text-center">
                                    <span class="relative inline-block px-3 py-1 font-semibold text-white leading-tight">
                                        <span aria-hidden="true" class="absolute inset-0 bg-green-500 rounded-full">
                                        </span>
                                        <span class="relative">
                                            @if (isset($post->category_id))
                                                {{ $post->category->category_name }}
                                            @else
                                                カテゴリーなし
                                            @endif
                                        </span>
                                    </span>
                                </td>
                                <td class="px-5 py-5 border-b border-gray-200 bg-white text-sm text-center">
                                    @if ($post->publish_flg === 0)
                                        <span class="relative inline-block px-3 py-1 font-semibold text-blue-900 leading-tight">
                                            <span aria-hidden="true" class="absolute inset-0 bg-blue-200 opacity-50 rounded-full">
                                            </span>
                                            <span class="relative">
                                                下書き保存
                                            </span>
                                        </span>
                                    @elseif ($post->publish_flg === 1)
                                        <span class="relative inline-block px-3 py-1 font-semibold text-green-900 leading-tight">
                                            <span aria-hidden="true" class="absolute inset-0 bg-green-200 opacity-50 rounded-full">
                                            </span>
                                            <span class="relative">公開済み</span>
                                        </span>
                                    @elseif ($post->publish_flg === 2)
                                        <span class="relative inline-block px-3 py-1 font-semibold text-amber-900 leading-tight">
                                            <span aria-hidden="true" class="absolute inset-0 bg-amber-200 opacity-50 rounded-full">
                                            </span>
                                            <span class="relative">予約公開</span>
                                        </span>
                                    @else
                                        <span class="relative inline-block px-3 py-1 font-semibold text-green-900 leading-tight">
                                            <span aria-hidden="true" class="absolute inset-0 bg-green-200 opacity-50 rounded-full">
                                            </span>
                                            <span class="relative">下書き保存</span>
                                        </span>
                                    @endif
                                </td>
                                <td class="px-5 py-5 border-b border-gray-200 bg-white text-sm">
                                    <p class="text-center text-gray-900 whitespace-no-wrap">
                                        {{ $post->created_at }}
                                    </p>
                                </td>
                                <td class="px-5 py-5 mr-5 border-b border-gray-200 bg-white text-sm">
                                    <a class="mr-3 text-blue-700 whitespace-no-wrap underline" href="#">
                                        Edit
                                    </a>
                                    <a class="ml-5 underline text-red-700 whitespace-no-wrap" href="#">
                                        delete
                                    </a>
                                </td>
                                <td class="px-5 py-5 border-b border-gray-200 bg-white text-sm">
                                    <p class="text-center text-gray-900 whitespace-no-wrap">
                                        {{ $post->view_counter }}
                                    </p>
                                </td>
                                <td class="px-5 py-5 border-b border-gray-200 bg-white text-sm">
                                    <p class="text-center text-gray-900 whitespace-no-wrap">
                                        {{ $post->favorite_counter }}
                                    </p>
                                </td>
                            </tr>
                            @endforeach
                        </tbody>
                    </table>
                </div>
            </div>
        </div>
    </div>
</div>
@endsection
クリックすると、記事詳細へレッツゴーします。
総合トップ画面でDBの値をもとに記事などを表示させる
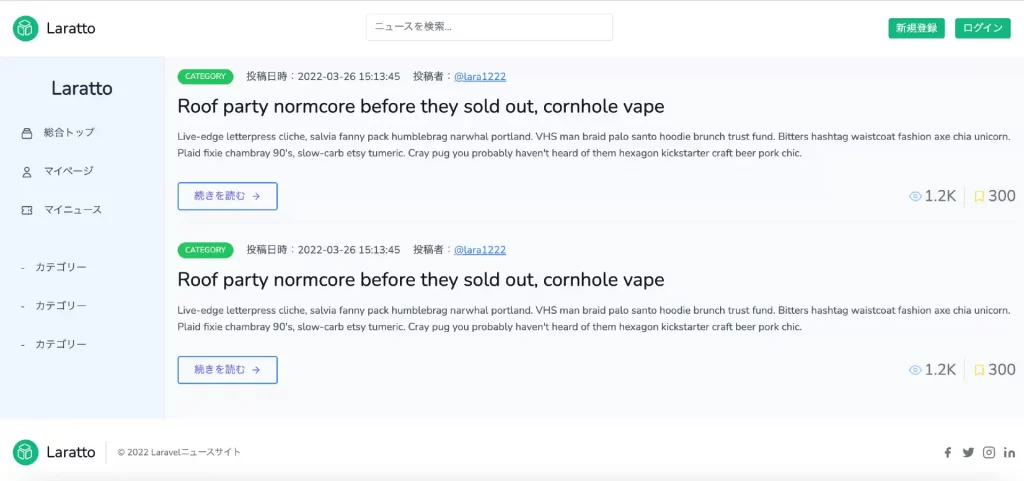
今はこんな感じで、カテゴリーや記事のタイトル、内容などはHTMLでベタ書き状態なので、DBの値を表示させていきます。
修正点としては、
- サイドバーのカテゴリーをcategoriesテーブルのカテゴリー名で表示
- 各記事のタイトルや投稿日時、投稿者、内容などはpostsテーブルの値を使って表示
するようにします。
これが、
こう。
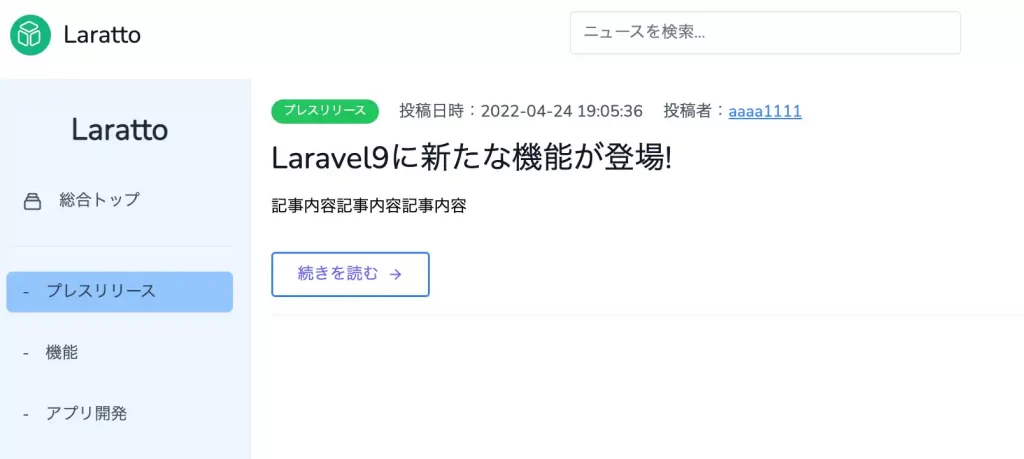
Topコントローラーのtopメソッドに、カテゴリー、記事一覧を取得する処理を追加します。
<?php

namespace App\Http\Controllers;

use Illuminate\Http\Request;
use Illuminate\Support\Facades\Auth;
use App\Models\Category;
use App\Models\Post;

class TopController extends Controller
{
    public function __construct()
    {
        $this->category = new Category();
        $this->post     = new Post();
    }

    /**
     * 総合トップ画面
     */
    public function top()
    {
        // ユーザーがログイン済み
        if (Auth::check()) {
            // 認証しているユーザーを取得
            $user = Auth::user();
            // 認証しているユーザーIDを取得
            $user_id = $user->id;
        } else {
            $user_id = null;
        }

        // カテゴリーを全て取得
        $categories = $this->category->getAllCategories();
        // 全ての投稿データを取得(publish_flgが公開のみ,最新更新日時順にソート)
        $posts = $this->post->getPostsSortByLatestUpdate();

        return view('top', compact(
            'user_id',
            'categories',
            'posts',
        ));
    }
}
総合トップの記事一覧取得ロジックであるgetPostsSortByLatestUpdate()はまだPostモデルに書いていないので、Postモデルにロジックを追加しましょう。
ちなみに、Userとリレーションを組んでいますが、これは投稿者の名前を引っ張ってくる時に使うからです。
$post->user->nameで記事の投稿者名を表示させるためです。
<?php

namespace App\Models;

use Illuminate\Database\Eloquent\Factories\HasFactory;
use Illuminate\Database\Eloquent\Model;
use App\Models\User;
use App\Models\Category;
use Illuminate\Support\Carbon;

/**
 * 投稿モデル
 */
class Post extends Model
{
    /**
     * モデルに関連付けるテーブル
     *
     * @var string
     */
    protected $table = 'posts';

    /**
     * 複数代入可能な属性
     *
     * @var array
     */
    protected $fillable = [
        'user_id',
        'category_id',
        'title',
        'body',
        'publish_flg',
        'view_counter',
        'favorite_counter',
        'delete_flg',
        'created_at',
        'updated_at'
    ];

    /**
     * Userモデルとリレーション
     */
    public function user()
    {
        return $this->belongsTo(User::class);
    }

    /**
     * Categoryモデルとリレーション
     */
    public function category()
    {
        return $this->belongsTo(Category::class);
    }

    /**
     * 投稿データを全て取得し、最新更新日時順にソート。総合トップ画面に表示する記事はステータス「公開」(publish_flg=1)のみ
     */
    public function getPostsSortByLatestUpdate()
    {
        $result = $this->where('publish_flg', 1)
                       ->orderBy('updated_at', 'DESC')
                       ->with('user')
                       ->with('category')
                       ->get();
        return $result;
    }
...省略
}
UserモデルにPostモデルとのリレーションを書きます。
<?php

namespace App\Models;

use Illuminate\Contracts\Auth\MustVerifyEmail;
use Illuminate\Database\Eloquent\Factories\HasFactory;
use Illuminate\Foundation\Auth\User as Authenticatable;
use Illuminate\Notifications\Notifiable;
use Laravel\Sanctum\HasApiTokens;
use App\Models\Post;

class User extends Authenticatable
{
    use HasApiTokens, HasFactory, Notifiable;

    /**
     * The attributes that are mass assignable.
     *
     * @var array<int, string>
     */
    protected $fillable = [
        'name',
        'email',
        'password',
    ];

    /**
     * The attributes that should be hidden for serialization.
     *
     * @var array<int, string>
     */
    protected $hidden = [
        'password',
        'remember_token',
    ];

    /**
     * The attributes that should be cast.
     *
     * @var array<string, string>
     */
    protected $casts = [
        'email_verified_at' => 'datetime',
    ];

    /**
     * postモデルとリレーション
     */
    public function posts()
    {
        return $this->hasMany(Post::class);
    }
}
総合トップ画面のtop.blade.phpを修正します。
{{-- layouts.common.blade.phpのレイアウト継承 --}}
@extends('layouts.common')

{{-- ヘッダー呼び出し --}}
@include('common.header')
{{-- サイドバー呼び出し --}}
@include('common.sidebar')
{{-- メイン部分作成 --}}
@section('content')
<section class="h-full bg-gray-50 text-gray-600 body-font">
    <div class="px-3 py-3 mx-auto">
        @foreach ($posts as $post)
        <div class="p-2 flex flex-col items-start">
            <div class="flex">
                <span class="bg-green-500 rounded-full text-white px-3 py-1 text-xs uppercase font-medium">{{ $post->category->category_name }}</span>
                <span class="ml-5 text-gray-600">投稿日時:</span>
                <span class="text-gray-600">{{ $post->updated_at }}</span>
                <span class="ml-5 text-gray-600">投稿者:</span>
                <span class="text-blue-500"><a class="underline" href="#">{{ $post->user->name }}</a></span>
            </div>
            <h2 class="sm:text-3xl text-2xl title-font font-medium text-gray-900 mt-4 mb-4">{{ $post->title }}</h2>
            <p class="leading-relaxed mb-8">{{ $post->body }}</p>
            <div class="flex items-center flex-wrap pb-4 mb-4 border-b-2 border-gray-100 mt-auto w-full">
            <a class="px-6 py-2 inline-flex items-center text-indigo-500 transition ease-in duration-200 uppercase rounded cursor-pointer hover:bg-blue-500 hover:text-white border-2 border-blue-500 focus:outline-none">続きを読む
                <svg class="w-4 h-4 ml-2" viewBox="0 0 24 24" stroke="currentColor" stroke-width="2" fill="none" stroke-linecap="round" stroke-linejoin="round">
                <path d="M5 12h14"></path>
                <path d="M12 5l7 7-7 7"></path>
                </svg>
            </a>
            <span class="text-gray-500 mr-3 inline-flex items-center ml-auto leading-none text-2xl pr-3 py-1 border-r-2 border-gray-200">
                <svg class="w-5 h-5 mr-1 text-blue-300" stroke="currentColor" stroke-width="2" fill="none" stroke-linecap="round" stroke-linejoin="round" viewBox="0 0 24 24">
                <path d="M1 12s4-8 11-8 11 8 11 8-4 8-11 8-11-8-11-8z"></path>
                <circle cx="12" cy="12" r="3"></circle>
                </svg>1.2K
            </span>
            <span class="text-gray-500 inline-flex items-center leading-none text-2xl">
                <svg xmlns="http://www.w3.org/2000/svg" class="w-5 h-5 mr-1 text-yellow-300" fill="none" viewBox="0 0 24 24" stroke="currentColor" stroke-width="2">
                <path stroke-linecap="round" stroke-linejoin="round" d="M5 5a2 2 0 012-2h10a2 2 0 012 2v16l-7-3.5L5 21V5z" />
                </svg>300
            </span>
            </div>
        </div>
        @endforeach
    </div>
</section>
@endsection
{{-- フッター呼び出し --}}
@include('common.footer')
こんな感じで、ベタがきではなくDBの値を使って表示できました。
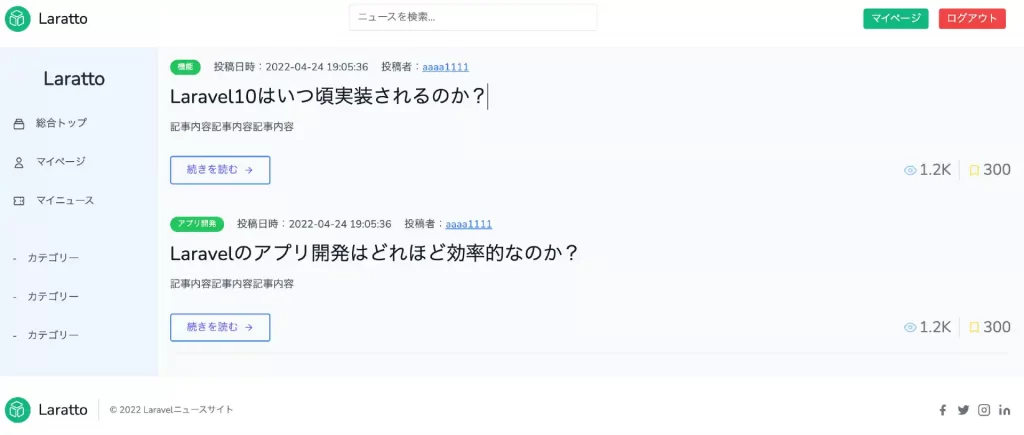
サイドバーのカテゴリーをcategoriesテーブルから取得する
次に、サイドバーのカテゴリーもcategoriesテーブルにあるカテゴリー名を表示するようにします。
@section('sidebar')
<div class="flex flex-col w-64 h-full px-4 py-8 bg-blue-50 border-r">
    <h2 class="text-center text-3xl font-semibold text-gray-800">Laratto</h2>

    <div class="flex flex-col justify-between flex-1 mt-6">
        <nav>
            <a class="flex items-center px-4 py-2 mt-2 text-gray-600 transition-colors duration-200 transform rounded-md hover:bg-blue-300 hover:text-gray-700"
            href="#">
                <svg class="w-5 h-5" viewBox="0 0 24 24" fill="none" xmlns="http://www.w3.org/2000/svg">
                    <path d="M19 11H5M19 11C20.1046 11 21 11.8954 21 13V19C21 20.1046 20.1046 21 19 21H5C3.89543 21 3 20.1046 3 19V13C3 11.8954 3.89543 11 5 11M19 11V9C19 7.89543 18.1046 7 17 7M5 11V9C5 7.89543 5.89543 7 7 7M7 7V5C7 3.89543 7.89543 3 9 3H15C16.1046 3 17 3.89543 17 5V7M7 7H17" stroke="currentColor" stroke-width="2" stroke-linecap="round" stroke-linejoin="round" />
                </svg>
                <span class="mx-4 font-medium">総合トップ</span>
            </a>

            @auth
                <a class="flex items-center px-4 py-2 mt-5 text-gray-600 transition-colors duration-200 transform rounded-md hover:bg-blue-300 hover:text-gray-700"
                href="{{ route('user.index', ['id' => $user_id]) }}">
                    <svg class="w-5 h-5" viewBox="0 0 24 24" fill="none" xmlns="http://www.w3.org/2000/svg">
                        <path d="M16 7C16 9.20914 14.2091 11 12 11C9.79086 11 8 9.20914 8 7C8 4.79086 9.79086 3 12 3C14.2091 3 16 4.79086 16 7Z" stroke="currentColor" stroke-width="2" stroke-linecap="round" stroke-linejoin="round" />
                        <path d="M12 14C8.13401 14 5 17.134 5 21H19C19 17.134 15.866 14 12 14Z" stroke="currentColor" stroke-width="2" stroke-linecap="round" stroke-linejoin="round" />
                    </svg>
                    <span class="mx-4 font-medium">マイページ</span>
                </a>

                <a class="flex items-center px-4 py-2 mt-5 text-gray-600 transition-colors duration-200 transform rounded-md hover:bg-blue-300 hover:text-gray-700"
                href="#">
                    <svg class="w-5 h-5" viewBox="0 0 24 24" fill="none" xmlns="http://www.w3.org/2000/svg">
                        <path d="M15 5V7M15 11V13M15 17V19M5 5C3.89543 5 3 5.89543 3 7V10C4.10457 10 5 10.8954 5 12C5 13.1046 4.10457 14 3 14V17C3 18.1046 3.89543 19 5 19H19C20.1046 19 21 18.1046 21 17V14C19.8954 14 19 13.1046 19 12C19 10.8954 19.8954 10 21 10V7C21 5.89543 20.1046 5 19 5H5Z" stroke="currentColor" stroke-width="2" stroke-linecap="round" stroke-linejoin="round" />
                    </svg>
                    <span class="mx-4 font-medium">マイニュース</span>
                </a>
            @endauth

            <hr class="my-6 border-gray-200" />

            {{-- カテゴリーを表示 --}}
            @foreach ($categories as $category)
                <a class="flex items-center px-4 py-2 mt-5 text-gray-600 transition-colors duration-200 transform rounded-md hover:bg-blue-300 hover:text-gray-700"
                href="">
                    <span>-</span>
                    <span class="mx-4 font-medium">{{ $category->category_name }}</span>
                </a>
            @endforeach
        </nav>
    </div>
</div>
@endsection
これで、サイドバーのカテゴリーもDBを使って表示できました。
総合トップ画面で記事の詳細を実装する
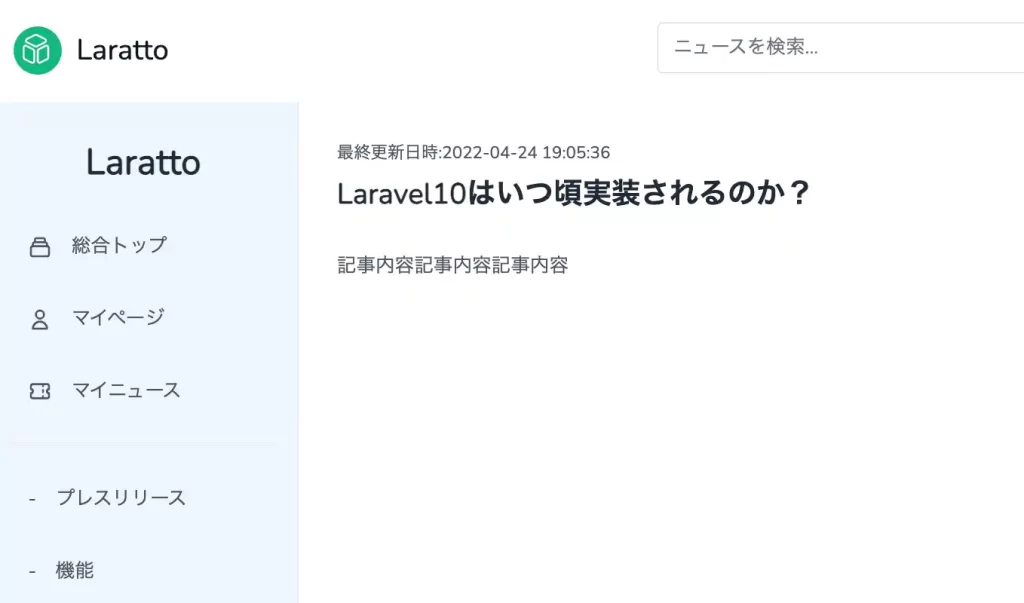
完成図

続きを読むをクリックすると、これがこう!

マイページの記事詳細は実装しましたが、総合トップの記事クリック→記事詳細へを作りたい!なので作ります。
続きを読むをクリックしたら、/article/1とかで、記事の詳細にアクセスするようにします。
ステップは、マイページの記事詳細と同じなので、割愛しますね。
総合トップ記事詳細画面用にルーティングを追加。/article/{post_id}でアクセスできるようにし、処理はTopコントローラーのarticleShowで行います。
<?php

use Illuminate\Support\Facades\Route;
use App\Http\Controllers\TopController;
use App\Http\Controllers\User\PostController;

/*
|--------------------------------------------------------------------------
| Web Routes
|--------------------------------------------------------------------------
|
| Here is where you can register web routes for your application. These
| routes are loaded by the RouteServiceProvider within a group which
| contains the "web" middleware group. Now create something great!
|
*/
Route::get('/dashboard', function () {
    return view('dashboard');
})->middleware(['auth'])->name('dashboard');

require __DIR__.'/auth.php';

// 総合トップ
Route::get('/', [TopController::class, 'top'])
    ->name('top');

// 総合トップ記事詳細画面
Route::get('/article/{post_id}', [TopController::class, 'articleShow'])
    ->name('top.article.show');

// マイページトップ・投稿
Route::get('/user/{id}/index', [PostController::class, 'index'])
    ->name('user.index');

// 投稿登録画面
Route::get('/post/create', [PostController::class, 'create'])
    ->name('post.create');

// 投稿登録処理
Route::post('/post/store', [PostController::class, 'store'])
    ->name('post.store');

// 投稿詳細
Route::get('/post/show/{post_id}', [PostController::class, 'show'])
    ->name('post.show');
総合トップのコントローラーにarticleShowメソッドを追加します。
<?php

namespace App\Http\Controllers;

use Illuminate\Http\Request;
use Illuminate\Support\Facades\Auth;
use App\Models\Category;
use App\Models\Post;

class TopController extends Controller
{
    public function __construct()
    {
        $this->category = new Category();
        $this->post     = new Post();
    }

    /**
     * 総合トップ画面
     */
    public function top()
    {
        // ユーザーがログイン済み
        if (Auth::check()) {
            // 認証しているユーザーを取得
            $user = Auth::user();
            // 認証しているユーザーIDを取得
            $user_id = $user->id;
        } else {
            $user_id = null;
        }

        // カテゴリーを全て取得
        $categories = $this->category->getAllCategories();
        // 全ての投稿データを取得(publish_flgが公開のみ,最新更新日時順にソート)
        $posts = $this->post->getPostsSortByLatestUpdate();

        return view('top', compact(
            'user_id',
            'categories',
            'posts',
        ));
    }

    /**
     * 記事詳細
     *
     * @param int $post_id 記事ID
     * @return Response src/resources/views/article/show.blade.php
     */
    public function articleShow($post_id)
    {
        // ユーザーがログイン済み
        if (Auth::check()) {
            // 認証しているユーザーを取得
            $user = Auth::user();
            // 認証しているユーザーIDを取得
            $user_id = $user->id;
        } else {
            $user_id = null;
        }

        // カテゴリーを全て取得
        $categories = $this->category->getAllCategories();
        // 記事IDをもとに特定の記事のデータを取得
        $post = $this->post->feachPostDateByPostId($post_id);
        return view('article.show', compact(
            'user_id',
            'categories',
            'post',
        ));
    }
}
getAllCategories()とfeachPostDateByPostId($post_id)はすでに定義済みなので心配ご無用でござる。
総合トップの記事詳細画面を作成するので、新規でsrc/resources/views/article/show.blade.phpを作成してください。
{{-- layouts.common.blade.phpのレイアウト継承 --}}
@extends('layouts.common')

{{-- ヘッダー呼び出し --}}
@include('common.header')
{{-- サイドバー呼び出し --}}
@include('common.sidebar')
{{-- メイン部分作成 --}}
@section('content')
<div class="px-8 py-8 mx-auto bg-white">
    <div class="flex items-center justify-between">
        <span class="text-sm font-light text-gray-600">最終更新日時:{{ $post->updated_at }}</span>
    </div>

    <div class="mt-2">
        <p class="text-2xl font-bold text-gray-800">{{ $post->title }}</p>
        <p class="mt-8 text-gray-600">{{ $post->body }}</p>
    </div>
</div>
@endsection
{{-- フッター呼び出し --}}
@include('common.footer')
総合トップの続きを読むをクリックしたら、記事の詳細画面に遷移するようにしましょう。
24行目あたりの続きを読むにhrefを追加してリンクをつけます。
<a href="{{ route('top.article.show', ['post_id' => $post->id]) }}" class="px-6 py-2 inline-flex items-center text-indigo-500 transition ease-in duration-200 uppercase rounded cursor-pointer hover:bg-blue-500 hover:text-white border-2 border-blue-500 focus:outline-none">続きを読むこれで、総合トップの記事一覧から続きを読むをクリックすると、記事の詳細画面に遷移できます。
(イェぇぇぇぇぇぇぇーーーーいいいいい!!!!!!ジャ↑スティス)

総合トップ画面でカテゴリーごとの記事一覧を実装する
完成図
ex.プレスリリースをクリックすると、カテゴリーがプレスリリースの記事一覧のみ取得

ルーティングを追加します。(デジャブ)/article/category/{category_id}でアクセスできるようにし、TopコントローラーのarticleCategoryで処理します。
<?php

use Illuminate\Support\Facades\Route;
use App\Http\Controllers\TopController;
use App\Http\Controllers\User\PostController;

/*
|--------------------------------------------------------------------------
| Web Routes
|--------------------------------------------------------------------------
|
| Here is where you can register web routes for your application. These
| routes are loaded by the RouteServiceProvider within a group which
| contains the "web" middleware group. Now create something great!
|
*/
Route::get('/dashboard', function () {
    return view('dashboard');
})->middleware(['auth'])->name('dashboard');

require __DIR__.'/auth.php';

// 総合トップ
Route::get('/', [TopController::class, 'top'])
    ->name('top');

// 総合トップ記事詳細画面
Route::get('/article/{post_id}', [TopController::class, 'articleShow'])
    ->name('top.article.show');

// 総合トップカテゴリーごとの記事一覧
Route::get('/article/category/{category_id}', [TopController::class, 'articleCategory'])
    ->name('top.article.category');

// マイページトップ・投稿
Route::get('/user/{id}/index', [PostController::class, 'index'])
    ->name('user.index');

// 投稿登録画面
Route::get('/post/create', [PostController::class, 'create'])
    ->name('post.create');

// 投稿登録処理
Route::post('/post/store', [PostController::class, 'store'])
    ->name('post.store');

// 投稿詳細
Route::get('/post/show/{post_id}', [PostController::class, 'show'])
    ->name('post.show');
総合トップのコントローラーにarticleCategoryメソッドを追加します。
<?php

namespace App\Http\Controllers;

use Illuminate\Http\Request;
use Illuminate\Support\Facades\Auth;
use App\Models\Category;
use App\Models\Post;

class TopController extends Controller
{
    public function __construct()
    {
        $this->category = new Category();
        $this->post     = new Post();
    }

    /**
     * 総合トップ画面
     */
    public function top()
    {
        // ユーザーがログイン済み
        if (Auth::check()) {
            // 認証しているユーザーを取得
            $user = Auth::user();
            // 認証しているユーザーIDを取得
            $user_id = $user->id;
        } else {
            $user_id = null;
        }

        // カテゴリーを全て取得
        $categories = $this->category->getAllCategories();
        // 全ての投稿データを取得(publish_flgが公開のみ,最新更新日時順にソート)
        $posts = $this->post->getPostsSortByLatestUpdate();

        return view('top', compact(
            'user_id',
            'categories',
            'posts',
        ));
    }

    /**
     * 記事詳細
     *
     * @param int $post_id 記事ID
     * @return Response src/resources/views/article/show.blade.php
     */
    public function articleShow($post_id)
    {
        // ユーザーがログイン済み
        if (Auth::check()) {
            // 認証しているユーザーを取得
            $user = Auth::user();
            // 認証しているユーザーIDを取得
            $user_id = $user->id;
        } else {
            $user_id = null;
        }

        // カテゴリーを全て取得
        $categories = $this->category->getAllCategories();
        // 記事IDをもとに特定の記事のデータを取得
        $post = $this->post->feachPostDateByPostId($post_id);
        return view('article.show', compact(
            'user_id',
            'categories',
            'post',
        ));
    }

    /**
     * カテゴリーごとの記事
     *
     * @param int $category_id カテゴリーID
     * @return Response src/resources/views/article/category.blade.php
     */
    public function articleCategory($category_id)
    {
        // ユーザーがログイン済み
        if (Auth::check()) {
            // 認証しているユーザーを取得
            $user = Auth::user();
            // 認証しているユーザーIDを取得
            $user_id = $user->id;
        } else {
            $user_id = null;
        }
        // カテゴリーを全て取得
        $categories = $this->category->getAllCategories();
        // カテゴリーIDをもとにカテゴリーごとの記事を取得
        $posts = $this->post->getPostByCategoryId($category_id);
        return view('article.category', compact(
            'user_id',
            'categories',
            'posts',
        ));
    }
}
カテゴリーIDをもとにカテゴリーごとの記事を取得するロジック、getPostByCategoryIdをPostモデルに追加します。
<?php

namespace App\Models;

use Illuminate\Database\Eloquent\Factories\HasFactory;
use Illuminate\Database\Eloquent\Model;
use App\Models\User;
use App\Models\Category;
use Illuminate\Support\Carbon;

/**
 * 投稿モデル
 */
class Post extends Model
{
    /**
     * モデルに関連付けるテーブル
     *
     * @var string
     */
    protected $table = 'posts';

    /**
     * 複数代入可能な属性
     *
     * @var array
     */
    protected $fillable = [
        'user_id',
        'category_id',
        'title',
        'body',
        'publish_flg',
        'view_counter',
        'favorite_counter',
        'delete_flg',
        'created_at',
        'updated_at'
    ];

    /**
     * Userモデルとリレーション
     */
    public function user()
    {
        return $this->belongsTo(User::class);
    }

    /**
     * Categoryモデルとリレーション
     */
    public function category()
    {
        return $this->belongsTo(Category::class);
    }

    /**
     * 投稿データを全て取得し、最新更新日時順にソート
     */
    public function getPostsSortByLatestUpdate()
    {
        $result = $this->where('publish_flg', 1)
                       ->orderBy('updated_at', 'DESC')
                       ->with('user')
                       ->with('category')
                       ->get();
        return $result;
    }

    /**
     * カテゴリーごとの記事を全て取得
     *
     * @param int $category_id カテゴリーID
     */
    public function getPostByCategoryId($category_id)
    {
        $result = $this->where('category_id', $category_id)
                       ->get();
        return $result;
    }

    /**
     * ユーザーIDに紐づいた投稿リストを全て取得する
     *
     * @param int $user_id ユーザーID
     * @return Post
     */
    public function getAllPostsByUserId($user_id)
    {
        $result = $this->where('user_id', $user_id)->with('category')->get();
        return $result;
    }

    /**
     * 下書き保存=>publish_flg=0
     * リクエストされたデータをpostsテーブルにinsertする
     *
     * @param int $user_id ログインユーザーID
     * @param array $request リクエストデータ
     * @return object $result App\Models\Post
     */
    public function insertPostToSaveDraft($user_id, $request)
    {
        $result = $this->create([
            'user_id'          => $user_id,
            'category_id'      => $request->category,
            'title'            => $request->title,
            'body'             => $request->body,
            'publish_flg'      => 0,
            'view_counter'     => 0,
            'favorite_counter' => 0,
            'delete_flg'       => 0,
        ]);
        return $result;
    }

    /**
     * 公開=>publish_flg=1
     * リクエストされたデータをpostsテーブルにinsertする
     *
     * @param int $user_id ログインユーザーID
     * @param array $request リクエストデータ
     * @return object $result App\Models\Post
     */
    public function insertPostToRelease($user_id, $request)
    {
        $result = $this->create([
            'user_id'          => $user_id,
            'category_id'      => $request->category,
            'title'            => $request->title,
            'body'             => $request->body,
            'publish_flg'      => 1,
            'view_counter'     => 0,
            'favorite_counter' => 0,
            'delete_flg'       => 0,
        ]);
        return $result;
    }

    /**
     * 予約公開=>publish_flg=2
     * リクエストされたデータをpostsテーブルにinsertする
     *
     * @param int $user_id ログインユーザーID
     * @param array $request リクエストデータ
     * @return object $result App\Models\Post
     */
    public function insertPostToReservationRelease($user_id, $request)
    {
        $result = $this->create([
            'user_id'          => $user_id,
            'category_id'      => $request->category,
            'title'            => $request->title,
            'body'             => $request->body,
            'publish_flg'      => 2,
            'view_counter'     => 0,
            'favorite_counter' => 0,
            'delete_flg'       => 0,
        ]);
        return $result;
    }

    /**
     * 投稿IDをもとにpostsテーブルから一意の投稿データを取得
     *
     * @param int $post_id 投稿ID
     * @return object $result App\Models\Post
     */
    public function feachPostDateByPostId($post_id)
    {
        $result = $this->find($post_id);
        return $result;
    }
}
総合トップのカテゴリーごとの記事一覧画面を新規で作成します。
新規で作成するファイルは、article > category.blade.phpです。
{{-- layouts.common.blade.phpのレイアウト継承 --}}
@extends('layouts.common')

{{-- ヘッダー呼び出し --}}
@include('common.header')
{{-- サイドバー呼び出し --}}
@include('common.sidebar')
{{-- メイン部分作成 --}}
@section('content')
<div class="px-3 py-3 mx-auto">
    @foreach ($posts as $post)
    <div class="p-2 flex flex-col items-start">
        <div class="flex">
            <span class="bg-green-500 rounded-full text-white px-3 py-1 text-xs uppercase font-medium">{{ $post->category->category_name }}</span>
            <span class="ml-5 text-gray-600">投稿日時:</span>
            <span class="text-gray-600">{{ $post->updated_at }}</span>
            <span class="ml-5 text-gray-600">投稿者:</span>
            <span class="text-blue-500"><a class="underline" href="#">{{ $post->user->name }}</a></span>
        </div>
        <h2 class="sm:text-3xl text-2xl title-font font-medium text-gray-900 mt-4 mb-4">{{ $post->title }}</h2>
        <p class="leading-relaxed mb-8">{{ $post->body }}</p>
        <div class="flex items-center flex-wrap pb-4 mb-4 border-b-2 border-gray-100 mt-auto w-full">
        <a href="{{ route('top.article.show', ['post_id' => $post->id]) }}" class="px-6 py-2 inline-flex items-center text-indigo-500 transition ease-in duration-200 uppercase rounded cursor-pointer hover:bg-blue-500 hover:text-white border-2 border-blue-500 focus:outline-none">続きを読む
            <svg class="w-4 h-4 ml-2" viewBox="0 0 24 24" stroke="currentColor" stroke-width="2" fill="none" stroke-linecap="round" stroke-linejoin="round">
            <path d="M5 12h14"></path>
            <path d="M12 5l7 7-7 7"></path>
            </svg>
        </a>
        <span class="text-gray-500 mr-3 inline-flex items-center ml-auto leading-none text-2xl pr-3 py-1 border-r-2 border-gray-200">
            <svg class="w-5 h-5 mr-1 text-blue-300" stroke="currentColor" stroke-width="2" fill="none" stroke-linecap="round" stroke-linejoin="round" viewBox="0 0 24 24">
            <path d="M1 12s4-8 11-8 11 8 11 8-4 8-11 8-11-8-11-8z"></path>
            <circle cx="12" cy="12" r="3"></circle>
            </svg>1.2K
        </span>
        <span class="text-gray-500 inline-flex items-center leading-none text-2xl">
            <svg xmlns="http://www.w3.org/2000/svg" class="w-5 h-5 mr-1 text-yellow-300" fill="none" viewBox="0 0 24 24" stroke="currentColor" stroke-width="2">
            <path stroke-linecap="round" stroke-linejoin="round" d="M5 5a2 2 0 012-2h10a2 2 0 012 2v16l-7-3.5L5 21V5z" />
            </svg>300
        </span>
        </div>
    </div>
    @endforeach
</div>
@endsection
{{-- フッター呼び出し --}}
@include('common.footer')
最後に、総合トップのカテゴリーをクリックしたら、そのカテゴリーの記事一覧(ex./article/category/2)に遷移するようにしましょう。
 ...省略
{{-- カテゴリーを表示 --}}
@foreach ($categories as $category)
  <a class="flex items-center px-4 py-2 mt-5 text-gray-600 transition-colors duration-200 transform rounded-md hover:bg-blue-300 hover:text-gray-700"
  href="{{ route('top.article.category', ['category_id' => $category->id]) }}">
    <span>-</span>
    <span class="mx-4 font-medium">{{ $category->category_name }}</span>
  </a>
@endforeach
これで、カテゴリーをクリックしたら、カテゴリーごとの記事一覧に遷移できます。

リファクタリングをする
ここまで処理を書いていきて、TopControllerの、
        // ユーザーがログイン済み
        if (Auth::check()) {
            // 認証しているユーザーを取得
            $user = Auth::user();
            // 認証しているユーザーIDを取得
            $user_id = $user->id;
        } else {
            $user_id = null;
        }
この処理がなん度も出てきてうざっっっっっっったいですよね。なので、サービスクラスを作ってロジックを切り分けます。
そうすることで、コントローラーの記述量もへるし、ソースの管理もしやすいですし、うざくないし、三方よしです。
それでは、サービスクラスをまずは作りましょう。
Laravelにはartisanコマンドでコントローラーとかはサクッと作れますが、サービスクラスの作成はコマンドないです。(作れ)なので、まずは、src/app/Services/UserService.phpを新規で作成しましょう。
ファイルを作成できたら、あとは先ほどのAuth::user………..のソースをこちらに移します。
>>>過去記事:Laravelでサービスクラスを作る手順
<?php

namespace App\Services;

use Illuminate\Support\Facades\Auth;

class UserService
{
    /**
     * ログイン時、認証しているユーザーIDを取得し、ログインしていない場合はnullを返す
     */
    public function loginUserId()
    {
        // ユーザーがログイン済み
        if (Auth::check()) {
            // 認証しているユーザーを取得
            $user = Auth::user();
            // 認証しているユーザーIDを取得
            $user_id = $user->id;
        } else {
            $user_id = null;
        }
        return $user_id;
    }
}
あとは、このloginUserId()をコントローラーで呼び出すだけです。
モデルのロジックを呼び出すのと似てます。(というかほぼ同じ要領)
<?php

namespace App\Http\Controllers;

use Illuminate\Http\Request;
use Illuminate\Support\Facades\Auth;
use App\Models\Category;
use App\Models\Post;
use App\Services\UserService;

class TopController extends Controller
{
    public function __construct()
    {
        $this->category = new Category();
        $this->post     = new Post();
        $this->userService = new UserService();
    }

    /**
     * 総合トップ画面
     */
    public function top()
    {
        // ログイン時、認証しているユーザーIDを取得し、ログインしていない場合はnullを返す
        $user_id = $this->userService->loginUserId();
        // カテゴリーを全て取得
        $categories = $this->category->getAllCategories();
        // 全ての投稿データを取得(publish_flgが公開のみ,最新更新日時順にソート)
        $posts = $this->post->getPostsSortByLatestUpdate();

        return view('top', compact(
            'user_id',
            'categories',
            'posts',
        ));
    }

    /**
     * 記事詳細
     *
     * @param int $post_id 記事ID
     * @return Response src/resources/views/article/show.blade.php
     */
    public function articleShow($post_id)
    {
        // ログイン時、認証しているユーザーIDを取得し、ログインしていない場合はnullを返す
        $user_id = $this->userService->loginUserId();
        // カテゴリーを全て取得
        $categories = $this->category->getAllCategories();
        // 記事IDをもとに特定の記事のデータを取得
        $post = $this->post->feachPostDateByPostId($post_id);
        return view('article.show', compact(
            'user_id',
            'categories',
            'post',
        ));
    }

    /**
     * カテゴリーごとの記事
     *
     * @param int $category_id カテゴリーID
     * @return Response src/resources/views/article/category.blade.php
     */
    public function articleCategory($category_id)
    {
        // ログイン時、認証しているユーザーIDを取得し、ログインしていない場合はnullを返す
        $user_id = $this->userService->loginUserId();
        // カテゴリーを全て取得
        $categories = $this->category->getAllCategories();
        // カテゴリーIDをもとにカテゴリーごとの記事を取得
        $posts = $this->post->getPostByCategoryId($category_id);
        return view('article.category', compact(
            'user_id',
            'categories',
            'posts',
        ));
    }
}
はい!これで認証しているユーザーIDを取得し、ログインしていない場合はnullを返す処理がスッキリしました〜
これで今日も快眠間違いなし!次回、記事の編集・更新をやっていきます。
>>>記事の編集・更新へ進む


休日で空いた時間の暇つぶしを探せるアプリを公開しています。






コメント